This wiki page is here for legacy reasons only. Older versions of MCreator used to have this feature or the feature does not need extended documentation anymore. Nevertheless, we kept the page for users of older versions.
MCreator for Arduino was replaced with Minecraft Link project! This page is here only for the historical reasons.

MCreator for Arduino was replaced with Minecraft Link project! This page is here only for the historical reasons.
MCreator for Arduino was replaced with Minecraft Link project! This page is here only for the historical reasons.
We have developed a set of tools to make it possible to connect your mods with the real world using Arduino. This can be a neat thing for a weekend project or school projects and can also be an introduction to the world of microcontrollers and electronics. On this page, you can find getting started instructions, sample projects, and downloads required to start working on your Minecraft-Arduino projects.
Hardware setup
For our demo projects, you need to make a circuit similar to the one shown below. Of course, you can modify it later as you become confident with our sample projects and understand what they do.
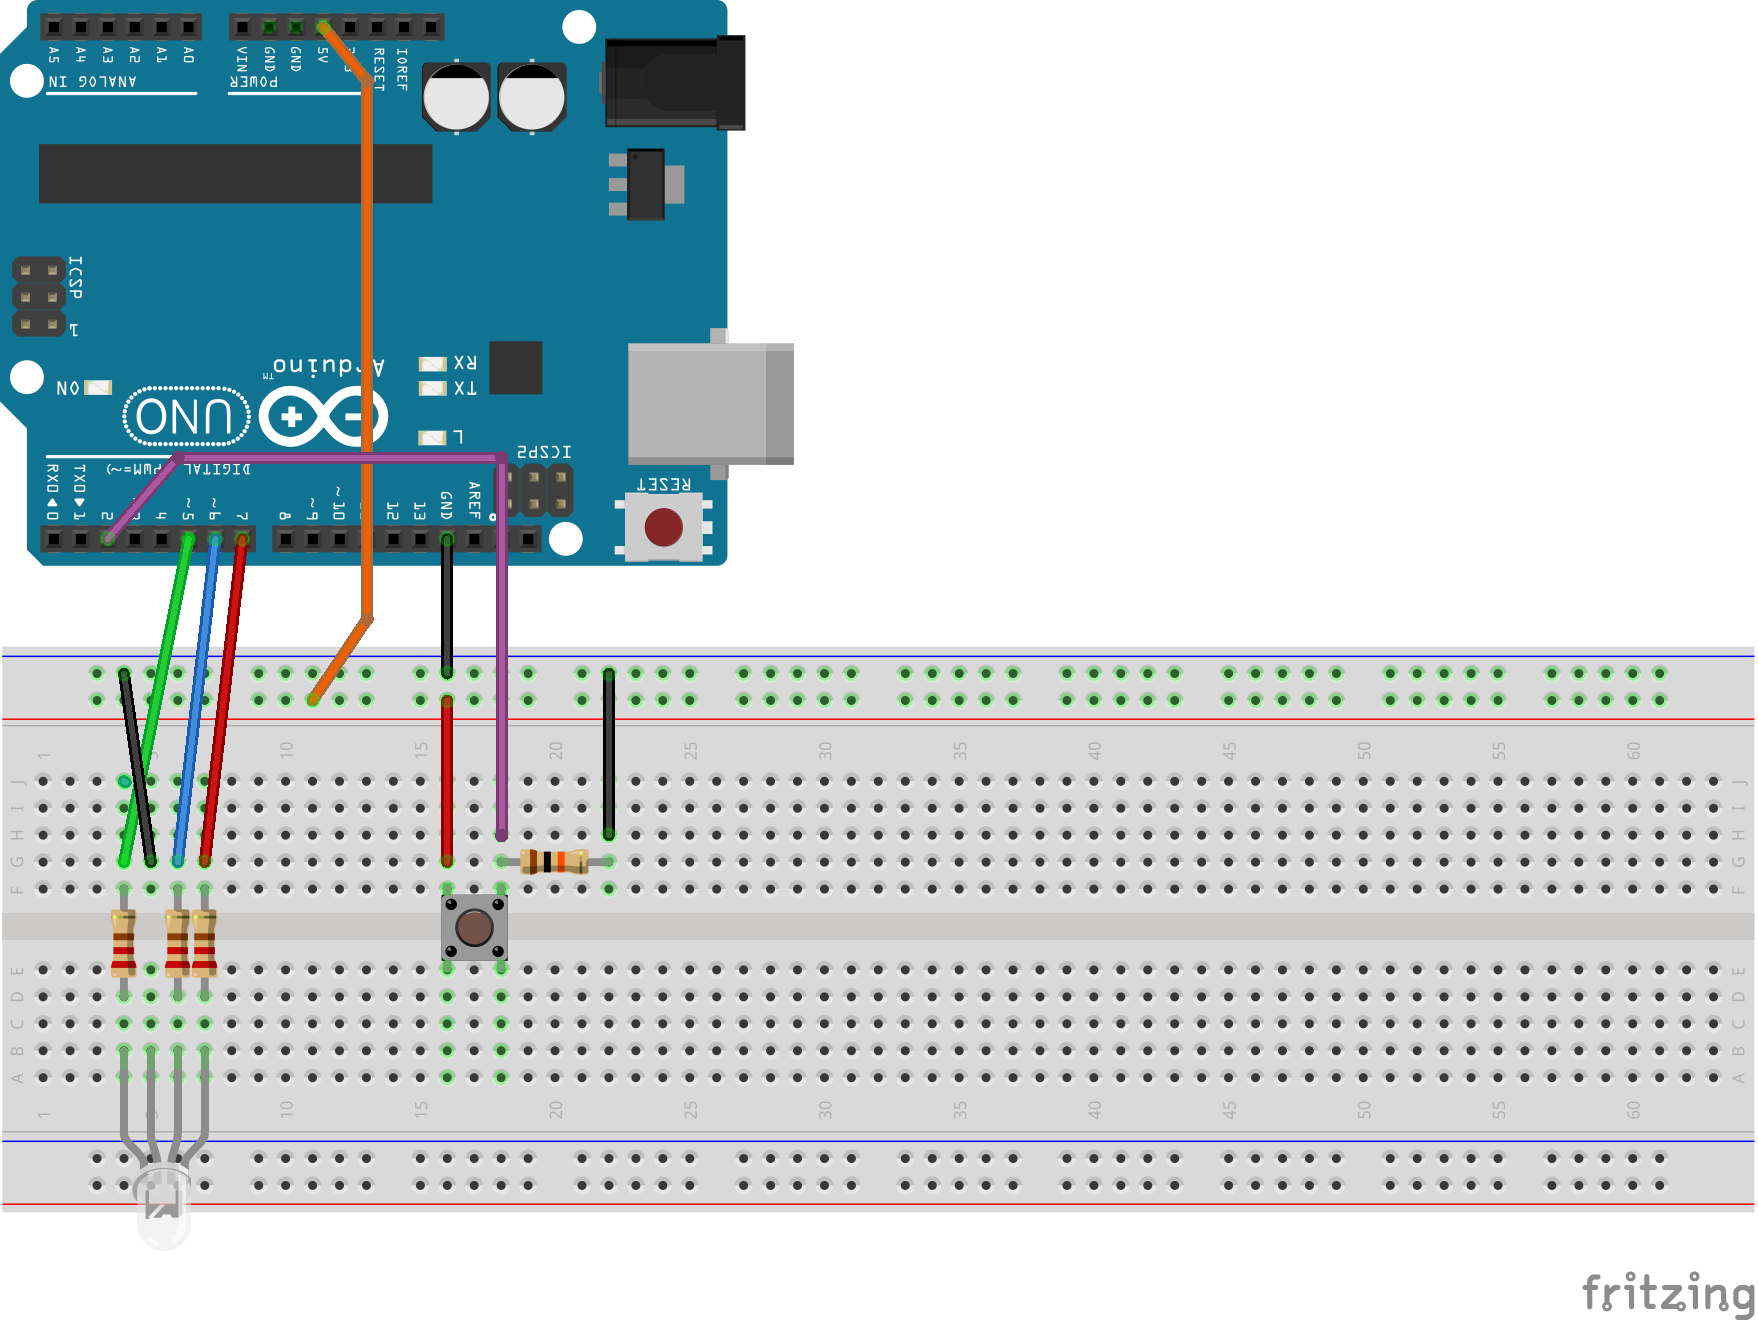
The resistors we used are 220ohm for the RGB LED and 10kohm for the pushbutton.
Programming Arduino
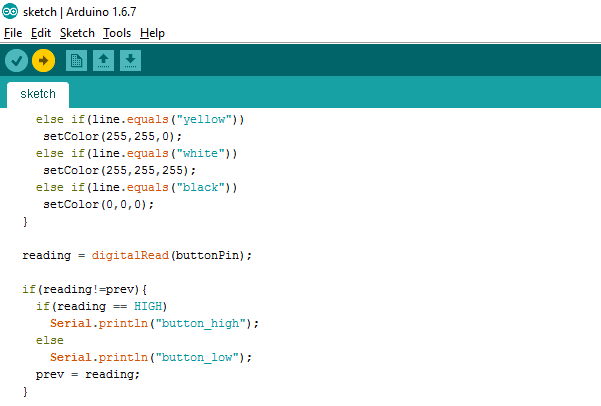
First, you need to connect your Arduino (Uno, Mega 2560 or similar) to the computer. Open Arduino IDE, open sketch file located in the sketch sub-directory of the downloaded toolkit and upload it to Arduino. You can find a tutorial on how to do this on the Arduino's official howto page. You can, of course, modify the sketch to your needs if you wish.
After you upload the sketch to the Arduino you are ready to connect it to your MCreator project. Each time you want to connect your Minecraft with MCreator for Arduino mod, you need to start the MCreator to Arduino connector which will forward your requests from the MCreator's mod to the Arduino.

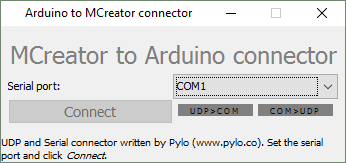
You need to select the serial port to which the Arduino is connected and click the Connect button. After you do this, you can start Minecraft with your Arduino compatible mod and start using it. If you don't run this connector, your mod will still load but won't affect or control the Arduino.
Code snippets
After you have connected your Arduino, it's time to make your mod. You can either send data to Arduino (control things like lights or motors) or receive data (status of the sensor, a button, ...).
Sending Data to the Arduino
This code sample shows how to send the control code to set the color of the LED on your hardware setup you previously made. You can see that this code will affect the Arduino sketch you uploaded previously so if you make changes to it, you might need to send your custom commands here. You can put this code in any event. Use Custom code event result and paste the code you see below in it. Don't forget to modify the value of the data message you send to your needs.
String msg = "[your data]";
try{
  java.net.DatagramSocket socket = new java.net.DatagramSocket();
  socket.send(new java.net.DatagramPacket((msg+""+(char)13).getBytes(),
     (msg+""+(char)13).getBytes().length,
     java.net.InetAddress.getByName("127.0.0.1"),5050));
  socket.close();
}catch(Exception e){}
For the sample needs, replace [your data] with red, green, blue, magenta, cyan, yellow or black to set the color of the RGB LED on the circuit.
Receiving Data from the Arduino
The code to receive the data is a bit more tricky. You need to put this code in the Custom code result of the update tick event of the block. This block needs to be present in the Minecraft world at least once in order to receive data from the Arduino. In this code, you need to add custom conditions and with them, you can set your custom variables and use them in your mod later.
if(System.getProperty("udp.server")==null){
  Thread t = new Thread() {
    public void run() {
      try {
        for (;;){
          java.net.DatagramSocket serverSocket = new java.net.DatagramSocket(5051);
          java.net.DatagramPacket receivePacket = new java.net.DatagramPacket(new byte[128], 128);
          serverSocket.receive(receivePacket);
          String data = new String(receivePacket.getData()).trim();
          if(data.contains("[customStringOne]"))
            mcreator_VarList%MAINMODNAME%.[varNameOne] =
             !mcreator_VarList%MAINMODNAME%.[varNameOne];
          serverSocket.disconnect();
          serverSocket.close();
        }
      } catch (Exception e) {
        e.printStackTrace();
      }
    }
  };
  t.start();
  System.setProperty("udp.server", "run");
}
Replace the [customStringOne] with the data you want to be received in order to change the variable with the name [varNameOne] (you need to replace this with the actual name of the variable). For our example, replace [customStringOne] with button_high. This string is sent from Arduino each time you press the button. The line below the if the condition requires the boolean type variable to be defined on the MCreator's Variable list. Make sure to set the proper name. This variable will then toggle from true to false and back on each button press on your circuit. You can use this variable in other mod elements.
Tutorials
Further work
If you would like to extend the functionality of this, you are welcome to do so as all the code of this project is open-source. If you have problems, you can ask a question in the Advanced modding section of our forums or you can contact us to help you out. We will also periodically upload sample tutorials on our YouTube channel.