Step 1: Downloading installer
Download the latest MCreator Minecraft mod maker version for Windows. If possible, use the installer instead of the archive as the installer will make sure to install MCreator in the proper location and will add an uninstaller entry, so you can easily uninstall MCreator at any time.
When the download is complete, click on the installer download icon to open it.
Step 2: Running the software
Go to the C:/Pylo/MCreator#### (where #### is the latest version number of MCreator) and run MCreator.exe. If you have used the installer to install MCreator, you will have a shortcut on your Desktop that you can use to launch the software.

Step 3: Firewall
When MCreator first needs internet access, you might be asked by the Windows Firewall to allow java.exe to access the internet. You need to grant the internet access to be able to download needed libraries and the selected Minecraft modding API files. If you encounter issues during workspace setup, please check our Gradle problem troubleshooting page.
Troubleshooting
Windows Defender shows a warning
Versions before MCreator 2023.4 are not codesigned. For those versions, you might get a warning like this:

This is because the MCreator's installer is not signed. Click on More info. The window will show a new Run anyway button. If you downloaded MCreator from the official website (mcreator.net) you are safe to click Run anyway and install MCreator on your computer.
The setup gets stuck or ends with errors
If the setup gets stuck or gives you errors, there are many reasons for this. But in 95% of the cases, this is caused by one of these so rule out these first (for testing you might just want to disable them):
- Antivirus (Avast is known to do this) blocking MCreator from reading and writing files
- Antivirus or firewall blocking internet access of MCreator
- VPNs or Proxies interfering with MCreator's internet connection
If this does not fix the issue, check our Knowledge base or Gradle problem troubleshooting page for more info.
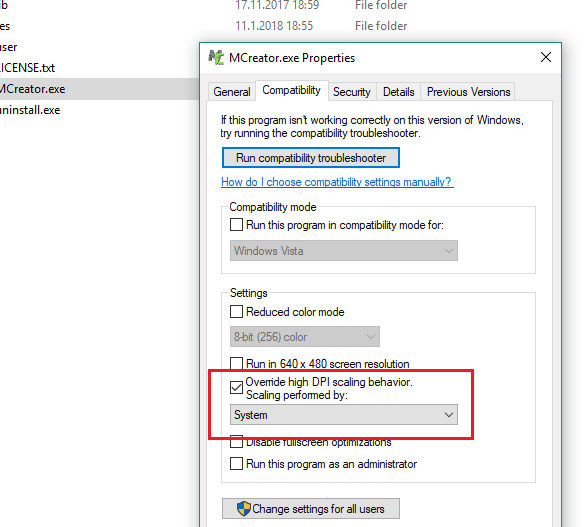
High DPI screens
If you are using MCreator 2021.2 or newer, you don't need to follow this guide. If you have problems with High DPI screens, you can override high DPI scaling behavior and set it to the System option. To do so, right-click on MCreator.exe, open the Compatibility tab, and select the options highlighted in the red square.
If you are looking for installation instructions for older releases, check MCreator's Wiki for the legacy installation procedure