This tutorial assumes you have already installed MCreator Link in your Minecraft Client. If this is not the case, please first read the installation tutorial for the MCreator Link for Minecraft.
Installation of MCreator Link on Arduino
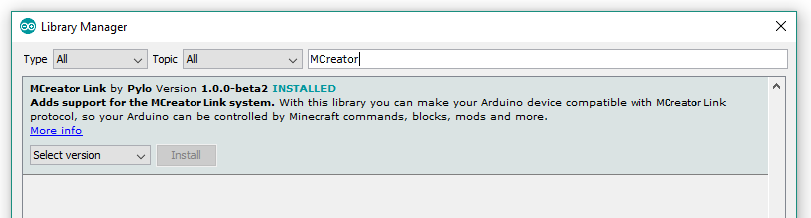
We have contacted Arduino IDE developers to include our MCreator Link for Arduino Library in the Library Manager. All Arduino IDE compatible devices are supported.
- Open Arduino IDE and go to Tools -> Manage Libraries...
- Enter MCreator Link in the search box (Filter your search...)
- Click Install to install MCreator Link in Arduino IDE
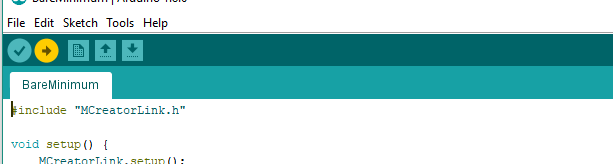
- Go to File -> Examples -> MCreator Link -> BareMinumum
- A new sketch will open. Select your Arduino board and upload it on it
Connecting to Arduino from MCreator Link
Once the MCreator Link sketch is loaded on the Arduino, we can connect to it from Minecraft.
- Launch the Minecraft with Minecraft Forge and MCreator Link installed
- On the home screen, press L to open MCreator Link window
- Connect Arduino to the computer. Make sure the serial port of the Arduino is not in use. Wait until your Arduino does show on the screen, select it and press Connect.
- If the connection is successful, the green CONNECTED text will be shown next to the selected device
If the Arduino is not listed on the screen, try resetting your Arduino board or unplugging it and plugging it back in the computer.
Verifying the connection
We can verify the connection by opening one of the Minecraft Worlds with cheats enabled. Once you are in the world, enter the following command in the chat:
/link deviceWhen you execute this command, the name of the connected device should be shown. The number of digital and analog pins should be shown too.
Basic pin control test
Most Arduino compatible boards have onboard LED installed and it is usually located on the digital pin 13. We can use this LED to test if the connection to the MCreator Link is working. First, we need to set the pin 13 to the output mode, so it can control the LED power state. Enter the following command in the Minecraft Chat:
/link pinmode 13 outNext, we turn the LED on:
/link digitalwrite 13 1We set the pin 13 to the high state (1). The onboard LED should turn on. We can now turn it back off by entering the following command:
/link digitalwrite 13 0Pin/port numbers
MCreator Link uses the same port numbers as native Arduino environment, so you can use your ordinary pinouts for the use with MCreator Link.
Video tutorial
If you prefer to watch the video, you can find the wiki page above summarized in a video:
Next steps
Now that you have successfully connected your Arduino, you can start making your fist MCreator Link compatible mod.
- If you would like to develop MCreator Link mod inside MCreator, read the MCreator Link procedures tutorial
- If you would like to learn more about MCreator Link commands, check MCreator Link commands reference
- If you would like to manually code mod for MCreator Link, check its API getting started guide